
I recently saw a t-shirt that made me smile. It said, “Sometimes I do such a big eye roll that I see my own brain.” You might have had a similar response when you read the title of this post. Really? RV life and shoes? If you thought that, then you’ll be especially surprised to learn that discussions about RV life and shoes is one I’ve had multiple times with other RVers. Should you take them off before getting in? Do you leave them at the door? And, most of all, how do you find a perfect place for them. The latter problem is real. The problem is, like so many others, a problem of space.
I want start with a few tips about RV life and shoes, then move on to share a few creative ways to deal with where to put shoes. These are mostly ideas I’ve gotten from others and not ones I’ve tried out myself. But hopefully they will get your creative juices flowing, help you to think outside the box so you find the perfect place for shoes in your own small space.
Tips for RV Life and Shoes
Tip #1: Before starting RV life, downsize, downsize, downsize. The greatest tips in the world won’t do you a bit of good if you simply have too many shoes for RV life. This means getting down to the bare minimum and being realistic about what you’ll need.
Most people allow four to six pair of shoes per person. Even that sounds like a lot but I count everything including slippers and slip-ons for fast dog walks or a run to the laundry room. Add a couple pair of sneakers and sandals. And you’re done.
I have four pair inside my rig—slippers, Crocs, flip flops and a pair of my favorite brand (Brooks Ariel) of sneakers. However, in all fairness, I must add that these are not my only shoes in RV life. I have extra sneakers still in their boxes in my van as I stocked up before hitting the road, since I knew I might have trouble justifying $150 sneakers once on the road, on a budget. I bought enough to last for several years, switching them out every six to twelve months depending on usage. In the van, I also have a pair of hiking boots, a pair of rain boots and a storage bin of sandals.
Tip #2: Do everything you can to not drag in dirt, leaves, sand, etc. on the bottom or your shoes into the rig. Obviously, this really isn’t about the shoes themselves and much more about keeping the rig clean. But you’d be surprised how annoyed you can get at your own shoes when you are constantly cleaning up behind them. However, if you have pets, taking your shoes off when entering is for naught because those scalawags will manage to drag in everything on their little paws.
Even so, here are a few ideas on that topic you can try:
- Carpet your RV’s steps so you can wipe your feet on the way in. Don’t have carpet on your RV steps? I just happened to have written a post on the subject. It was my first DIY RV project.
- I know many RVers who leave a boot scrapper outside their RV front door. It’s the much tougher, more serious version of carpet. And every time I see one, I’m transported back to the 200-year-old boot scrapper I saw (and couldn’t figure out what it was until I read the information plaque) at the Hermitage, President Andrew Jackson’s estate in Tennessee.
Creative Solutions for Shoes Storage
In my tiny trailer, when you go in the door it’s almost like a mini-hallway. And, by that, I mean there is no open space upon entry. Walls are on both sides. You might remember the photo of my entryway from the post on finding a place for the kitty litter box since that’s where the kitty box lived for a long time.
However, that isn’t the case with most rigs. Many open into the living room. Therefore, many people choose to place something inside the door for shoes. I’ve seen small shoe racks or shoe stations, just like you’d have in your house. I’ve also seen RVers use a box or a bin (either plastic or collapsible fabric) where you just toss the shoes in.
One double-duty version of this is a padded footstool with storage because it gives you a place to sit while removing your shoes and then the top opens and you put the shoes inside. Triple duty if you want to drag it over to your living area and use it for a footstool. In RV life, double and triple duty items are awesome.

Another carry-over from sticks-and-bricks is the hanging shoe rack. In houses, I’ve seen people use both the metal and the fabric ones. But in RV life, I’ve only seen the fabric ones. If I were to guess the reason, I’d say that the fabric ones are less likely to scratch and cause damage during travel. Even in a tiny rig like my Oliver, I’ve seen many who employ this option, hanging the shoe rack on the inside of the closet door.
Bonus Tip
So, you know the hanging shoe racks are made up of individual pockets?One shoe per pocket. For some sandals and flip-flops, you can get both shoes in a single pocket. Or a pair of child’s shoes also fits in a single pocket. But—here’s the tip—if you have extra pockets, once you’ve secured all your shoes, make use of them. They would be perfect to hold dog poop bags, cleaning supplies or other items you might need when heading out like mittens, hats, scarves.
More Creative Shoe Storage Solutions
I met someone who came up with a super creative way to get her shoes off the floor. This one I copied. It can be done anywhere—low or high. In essence, you secure the shoes to the wall.

Attach two hooks the width of a pair of shoes. Put the shoes against the wall, heal-side at the top. Secure with a mini bungee cord. Super easy DIY project. And if you use the Command hooks, it’s also super easy to move whenever you want a change.
A variation on this idea is that you could simply use hooks. Though if the hook is shallow (and most are), the shoe would have a tough time remaining flat against the wall. But, like I said at the beginning, this post is intended to offer ideas as a jumping off place for finding your own creative solution. It might take some experimentation with different ideas to find the right one for you.

The last idea I want to share is probably more about shoe storage and perhaps not ideal for the shoes you wear every day. So, you know how all RV beds sit on a platform of some sort? That means you have another flat vertical space.
Now, if you have a bed that butts against three RV walls, then you might only have one flat space on the platform. Even if you can get to three sides of your bed, some platforms have built-in drawers. If those are regularly accessed, it probably would not work to use the fronts for shoe storage. But it might.
In my twin bed space, I have 12 inches of vertical flat space that support the mattress above and runs 52 inches long. Normally, this is space none of us would give a second thought to. But at the Oliver Owners Trailer Rally, the Ladybugs (two sisters who travel together and whose rig is decorated with a lady bug theme, so we all called them the Ladybugs though their names are Robin and Susan) came up with a super creative and out of the way place for shoes.
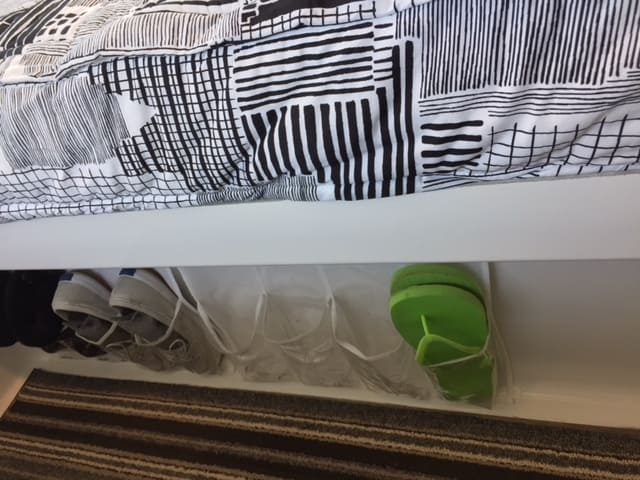
They used that vertical space and hung a single row of hanging pockets. I thought the idea brilliant and the photo is of their rig.
It’s not something I can replicate, at least not right now, as I have some storage bins in front of the beds that serve as steps for the cat to get up. And Solstice too, when I still had her. The pets are too old to get up without steps.
What Else?
Any other creative ideas for shoe storage? Or tips about shoes and RVs in general? In tiny spaces, you definitely have to get creative when coming up with storage solutions. Would love to hear your thoughts.
Links to Referenced SSL Blog Posts Above:
- Hack: Adding Carpet to your RV Steps
- Middle Tennessee
- But, Where Do You Put the Kitty Litter Box in an RV?
To see products recently purchased by readers or to browse and shop at Amazon, follow either of these links. Every purchase is so appreciated and supports the efforts of this website.
Affiliate Link Disclosure. As a result of being an Amazon Affiliate, I earn from qualifying purchases.


Debbie, love reading your posts! Hope you remember me from the rally. I have not ordered my Oliver yet (but have put a down payment on one) and I have some questions on what I need and what I don’t that I hope you can help me with. What kind of antenna did you get (there are 4 to choose from).. Did you get a cell phone booster, WiFiranger sky pro pack, shower package (I am getting a composting toilet). Are there any items that you wish you had bought but didn’t? Did you consider buying a used Oliver? Remember I am the 72 year old single woman on a fixed income..so, a used one looks good to me, but I have put $5000 down on a new trailer and doubt I can get that money back if I back out. Any suggestions would be great. Thank you so much.
Of course I remember you! Sorry for the delay in replying. I was had three travel days and, on those days, very little else gets done. Okay, let me answer your questions. I looked on my receipt to verify because I couldn’t remember about the antenna. I watch movies rather than tv, so that was one of the few upgrades/add-ons I didn’t get. I got whatever came standard with the rig. Though in campgrounds I see a lot of those bubble ones like the Winegard. I did get the cell booster and the wi-fi ranger. And, I’m a little embarrassed to say, that two years later and I still have not used either one. For internet, I got a AT&T hotspot, then I have a little antenna that extends the signal. (I’m going to write about the antenea in a post on 10/21/19) and that setup has worked really well for me. So, I haven’t been forced to figure out the others. So, in my case, those may have ended up being a waste of money.
I did consider buying used, but I had some challenges. First, I was in Alaska and still working, so the logistics would’ve been a nightmare. My rig is #249, so when I was looking there was only 200 Olivers even made which meant during my research phase, I never saw one come up for sale that was used. Now that over 500 are on the, that is more of a possibility. I would definitely consider one. They are still well-built and, most owners, seem to take really good care of their Olivers. I would definitely ask Oliver about getting your down payment back. They would have no problem selling the rig you were assigned to and they are a good company and thoughtful toward their customers. If they won’t give you the money back, maybe they would let you have it as credit toward service. Then any upgrades or when you take it in for service (I’m doing mine once a year), you’d have funds to cover it and not lose your money.
There wasn’t a shower package when I ordered and, from what I’ve seen people say on the forum and Facebook, most don’t think that shower upgrade is worth what they are charging. I did have them put a shower bar across my bathroom door. I was charged $225 for it. Then I keep a regular sized shower curtain on it and when I shower, I drape it over the composting toilet (probably my favorite add on) so it doesn’t get wet. I like the shower curtain across the doorway so I don’t have to shut the bathroom door for both room and air circulation.
The one add-on I got that, by far, gives me the most problems and is most physically taxing (which, makes it the most stressful) is the Anderson weight distribution/anti-sway hitch. I know lots of other owners who didn’t get it and say that they don’t have any towing problems. That’s probably the add-on I’d be most hesitant to recommend to you.
All that said, I also want to say I’m so excited you are moving forward and following your dream. One is never too old for that!
How is the shoe holder attached to the wall under the bed?
Okay, Kathy, you made me really have to put on my thinking cap and try to remember what they told me. They best that I can recall is that they used Command strips. The shoes aren’t very heavy so it probably didn’t take too many. But if you were putting in sneakers and heavier shoes, you might need five or six of them.
Under bed shoe holder … extremely clever! You would have thought of it sooner or later. Love, Marie
Yeah, I thought so too. I think it’s especially clever because it’s space that would otherwise go completely unused.
To what part of the wall is the shoe holder attached underneath the bed?
Hi Barb. Good question. Under the bed might work for some RVs. For those with an Oliver, it won’t. Command strips are my go-to product for hanging or attaching anything in the fiberglass trailer (either the hooks or the Velcro ones). You could also use a tension rod to hang the shoe holder if there was two ends to hold up the rod. In the Oliver twin bed model, you could have a short rod and shoe holder if you went perpendicular to the beds, under the night stand. Hope that helps.