This post, originally written in March 2018, posted a couple of months after I decided to add carpet to my RV steps. I revisit the topic today because: out with old, in with the new. In other words, it was time to re-carpet the RV steps. For the most part, the post remains the same though I added clarification and other thoughts throughout. Photos with blue carpet are from the original post. Photos with brown carpet are from the re-carpet project.
Regardless what type of RV you own, carpeting the steps can be a good thing. Plus, it’s a super fast and easy DIY project.
Original Introduction
One of the downsides of buying a brand-new trailer is that it made me hesitate to change anything. It’s new and shiny so the idea of drilling a hole or painting something or changing anything makes me cringe a bit. When it’s new and shiny, you just want it to stay new and shiny.
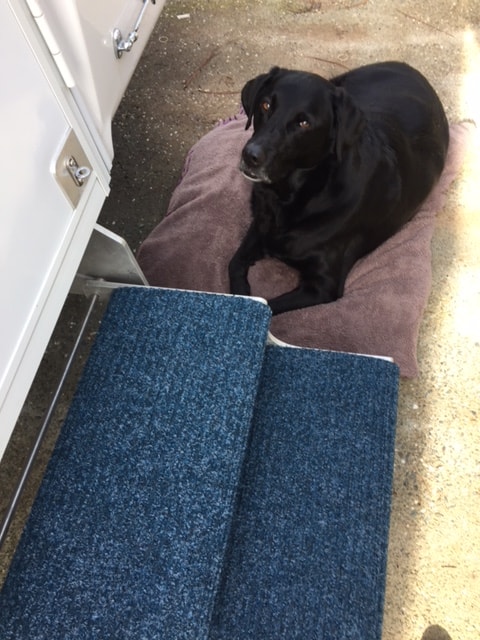
But when I was in Walla Walla, there was snow followed by an ice storm. Despite my efforts to help her on the slippery RV steps, my dog fell down them a few times. That’s a hard fall. Metal, Concrete. Ice. At her age, she cannot be falling like that. She isn’t as bouncy and rubbery as she once was.
To get by, I would lay down a towel when we went in and out so her feet could get a grip. But I vowed to come up with a better solution. (Well, besides just staying the heck out of snow and ice!) I decided to add carpet to the RV steps. Here’s how.
Which Type of Carpet Is Best?
In my mind, carpeting the steps would be easy. And it was. What I didn’t realize was how many different options there were. None were that complicated, but I mention it here because it was surprising to me.
With Glue
I found two basic types of RV step carpeting. First, there’s carpet with a sticky-back that adheres to the steps. Although it got decent reviews, I worried:
- Sticky stuff could be hard to get off when it came time to remove the carpet, or
- It not being sticky enough to actually stay on with wear and weather.
I dismissed the sticky-back carpet. To be fair, though, I could be entirely wrong in my concerns and my reasons for not going this route.
I chose the carpet without glue.
Without Glue
The next choice I had to make was what kind of carpet. And there is a lot of variety. You can get the turf stuff (like fake grass stuff though in a variety of colors) which I thought would be great for getting icky stuff off the bottom of shoes but I worried it would hurt my dog’s feet. You can get a smooth carpet. Or you can get a carpet with deep treads which is what I chose thinking it would help with shoe crud. Plus it looks tougher so that could mean it will last longer.
The deep treads became a little less deep over time. However, I feel I easily could’ve gone another year or two before replacing the carpet. It hadn’t faded or fell apart or anything like that. The decision to replace it was because, to my eye, it was time.
I chose Prest-O-Fit Ruggids step. I would’ve preferred purple. Obviously. But I don’t think they make purple. Since the inside of my rig is black that was my second choice. But the black was $6 more than the blue and $3 more than the brown. How ridiculous is that? Longtime readers of the blog will already know I chose the blue. Because a $6 savings is a $6 savings.
I was so happy with the product, I chose the exact same product the second time around. This time, it was the brown that was less money. And, today, as I write this, the black is $9 less than the blue and $3 less than the brown. How weird is that? But it’s a lesson for me. In another three years, I’ll starting watching the price months before I do the project to try to get the best price on the the black.
My choice of carpet meant it would be held on with zip-ties. But I also saw ones held together with springs. I am intrigued by the springs. On the one hand, you could easily remove the carpet to shake out the carpet. But on the other, might the springs loosen over time?
Tips for Ordering and Cutting Carpet
Before I ordered the carpet, I measured my steps. My steps didn’t match any of the width options for any of the carpets. I ended up asking about that on Amazon. One purchaser thought the carpet was thin enough that it could be folded under to accommodate the smaller width. While another person said he cut the carpet and then burned the edges to make sure it wouldn’t fray.
I ended up doing neither of those suggestions. It wasn’t malleable enough to bend. After I cut it to size, I felt like it wasn’t necessary to burn the edge. No problem or fraying ever occurred.
If you need to trim the carpet to get it to fit, you’ll want to do it evenly from both sides. It means two cuts per step rather than one but that way the tie-downs will be even.
Other Tips
- Measure each step individually. Since my bottom step folds into the top step, the top step actually had to be trimmed down about a half-inch more than the bottom one.
- If a step doesn’t fold, you may have to lie on the ground to close the zip-ties from underneath. It’s harder but doable. That’s what I had to do for the top step. A yoga mat is handy for laying on the ground when working on the rig. Or, in my case and because it was closer, a dog bed works too. But beware: your dog might think the bed has been brought out for her.
RV How-To: Carpeting RV Steps


What You Need: RV Steps, Carpet, Scissors or Box Cutter, Measuring Tape

Measure width of step.

Cut to correct width.

Thread zip-ties through grommats.
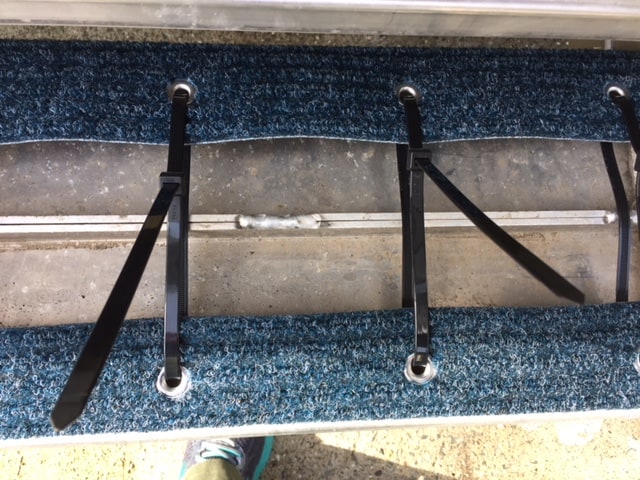
Pull snug to close. The instructions say snug but not too tight. My guess is that if they are over tight you risk them snapping.

Cut excess zip-tie.

One beautifully carpeted step.

Don’t assume that each step will have the same dimensions. Measure them separately. In my case, the upper RV step is slightly more narrow because of how it attaches to the rig.

For a second time, two beautifully carpet RV steps. This is such as easy DIY RV project.
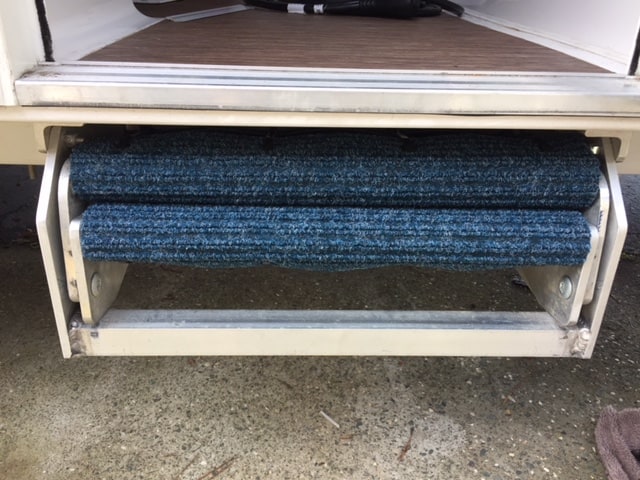
Fold the steps and put them away. Ready for the next adventure.
Since I first posted this RV steps carpeting how-to project, I’ve noticed several people used my link to buy the carpet themselves. If you have added carpet to your RV steps–either for safety or for looks–I’d love to hear if you love yours as much as I love mine. I cannot imagine, at this point, ever not having the steps carpeted.
Links to Other RV Hacks:
- Hack: Adding Mud Flaps to the RV’s Tow Vehicle
- Jacks Maintenance for Your RV
- How to Install a Water Pressure Regulator
To see products recently purchased by readers or to browse and shop at Amazon, follow either of these links. Huge thanks for your support.
- mDesign Adjustable/Expandable Plastic Drawer Organizer Tray
- Maximum Performance Dog Fence Wire
- Command Picture Hanging Strips Heavy Duty, Large
- Umbra Buddy Paper Towel Holder Stand for Kitchen Countertop
Affiliate Link Disclosure. As a result of being an Amazon Affiliate, I earn from qualifying purchases.


Since it’s not adhered, have you noticed any shifting when you step on it or when you wipe your feet?
I haven’t noticed any, Angela. I pulled the zip-ties pretty tight. Plus I think with a little time, the carpet has formed to the step. It’s been fin in rain as well. I think the real test would be what happens in snow. Do they get a layer of slippery ice? It’s been almost 2 months since I added the carpet and so far, it has all been great.
Awesome! Have been pondering what to do with ours. Thanks for the tip!
What we will do for our fur babies! I think this was a good idea for you as well! Stay safe Debbie!
Becky
You definitely should do it for your babies! I wish I had thought to do it from the get-go. Even now I cringe when I think of Solstice slipping on that icy metal stair and falling. It was really easy to do. The hardest part was getting back up off the ground for the step I had to lay down to close.
Great idea Debbie. We might have to consider that for the RV. We don’t use it in the winter, but Seward, where it stays most of the summer, can be pretty wet. Thanks for going through the process.
Love reading about your adventures.
This was one of the first mods I made to my Scamp fiver. Having only one step made the install a little quicker and cheaper.
It’s been three years now and I have had zero problems with it.
Glad to hear after 3 years it is still doing the trick for you. I have kind of assumed that on a fairly regular basis I’d have to replace the carpet. But maybe not. Makes the investment an even better one.
That is awesome!! Especially liked the picture with Solstice and her new steps. Nice work!
We’ve got wooden deck steps that can be slick. This could work great for us, too. Thanks!!
Yeah, I pulled out the pillow to cushion me laying on the ground. And just like the bed in the RV, she got 90% of the pillow while I got the leftovers. Yeah they would work on wooden steps. You might want the carpet with the spring back so during extended nice weather you can take it off. With wood, you might have to watch for trapped moisture.
Nice mod!! We had carpet on our motorhome steps years ago but I hadn’t thought about it on the Oliver. Our little Shih Tzu is old and so we carry him out. Come to think of it…he wouldn’t have been able to do the steps 8 years ago either! ?
You know, I never gave much thought at all to having a larger dog when I lived in a sticks-and-bricks. But I find myself thinking about it a lot as an RVer. As she is getting older, my dog is struggling more and more. I have some “steps” rigged up for her to get onto the bed because at 80 pounds I simply cannot lift her in and out, up and down. I can only support her or boost her she does it. It applies to getting up and down from the bed, getting in and out of the trailer, getting in and out of the van. A smaller dog, I am pretty sure, is a better match for the RV life.
I didn’t say this in the post, but in that cold weather the dog wasn’t the only one who found the steps hard to navigate. I held on to the hand-hold tight when getting in and out. That ice and snow made them impossible to use gracefully. So if there is any chance you guys will get into below freezing temperatures, definitely consider carpeting the steps.
I am glad you covered the steps. The metal gets so slick. I once slid on a metal step with one foot and somehow I kicked my other ankle hard enough to bleed. Love, Marie
It is interesting timing of my post. I just saw on a group I’m in on social media that a woman reminded everyone to have non-skid strips on RV steps. She slipped on hers and broke her leg. Crazy! No only do I have the carpet now, but I always use the hand hold when getting in or out of the trailer.
Thanks for the article Debbie. Found your blog on Pinterest. Have you done any specific upkeep to the steps? I have some carpet cleaner but I have also heard you can just hose it down with water. Any tips?
Hi Janae. To be perfectly honest, I did nothing to mine in terms of maintenance. Rain is, essentially, the only hose-down I use. The price of the carpet is such that every couple years, I simply replaced it. It is pretty heavy duty so you could certainly hose it down without any issues. That said, I do keep a brush on the steps and regularly brush away the loose dirt so it doesn’t get dragged into the trailer. I continue to rank carpeting the steps as one of the best DIY projects I did on the trailer. The steps are so much better and less worrisome with the carpet than they were bare.
Awesome! Thanks for the insight. I just followed the Amazon link, I didn’t realize how cheap the steps are. Seems like replacing it every few years is the way to go like you mentioned!!