You might have a specified picture that pops into your mind when I say this post is about winterizing your RV. But the term is general enough that it actually covers two very different ways of preparing your RV for winter. First, there is winterizing your RV for storing it in a cold climate. Second, and the focus of today’s post, there is preparing the rig for RV winter living. What you need to do in each case is quite different from the other since in one case you are not staying in the RV and in the other you are.
Since I winterized my trailer and stored it over the 2020-2021 winter, it means I have experience with both types of winterization. I had help with that task (both winterizing and de-winterizing) and, though, I took notes, I’m not sure my knowledge is complete enough to advise on that aspect.
Because there is a lot to say about preparing your RV for winter living, this article starts with today’s post where I give a little background on the topic and a step-by-step guide to prepping the water hose. The second post is preparing your sewer line and addressing issues related to the RV itself including the water heater, furnace and the plumbing pipes that run throughout your RV.
Context
When I picked up my travel trailer in Tennessee in October 2017, the first place I drove was Walla Walla, Washington. Full-timing friends wanted company. But the big bonus was since they’d started six months earlier, they had six months more experience. Not to mention, my friend’s husband is super handy. So, they promised to help me get to know my new trailer and to teach me a few things regarding maintenance.
Honestly, I was so glad to start RV life around people I knew, since everything else about it was completely foreign. You might remember how unexpectedly difficult I found those first days of RV life. I found myself so appreciative, in fact, it never occurred to me to ask about the weather.
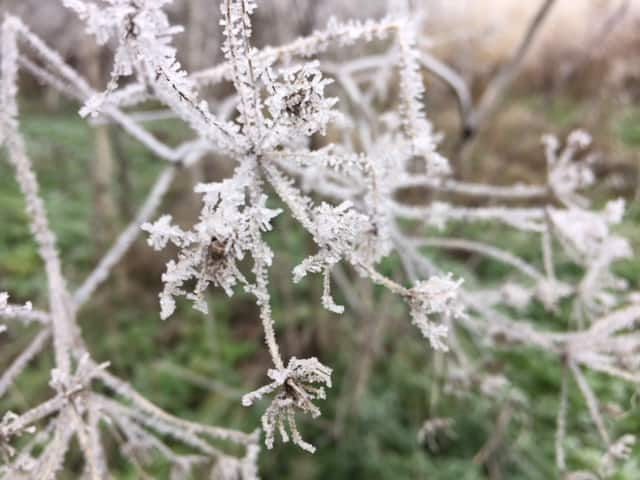
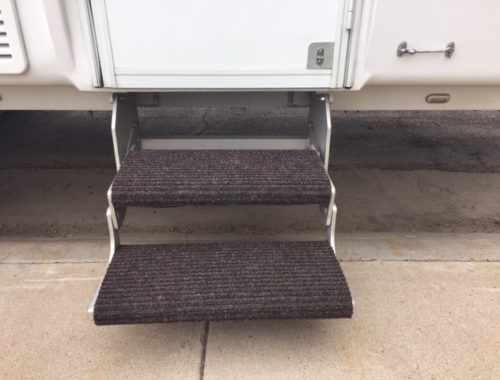
During the two months I visited there was snow plus a severe ice storm. If I’d done a list of firsts for 2017, experiencing an ice storm would be near the top of the list. Living in Alaska for 25 years prior didn’t prepare me for it. That’s for sure. And after Solstice slipped and fell on Quill’s ice-covered stairs, it was also what made me determined to carpet the RV steps. Fortunately, the ice didn’t stay long, but the snow did.
The same day I pulled into the RV park my friend’s husband went to work on preparing my trailer for RV winter living and the cold temperatures to come. So, right out of the gate, I dealt with one of the types of winterizing your rig.
RV Winter Living Preparation
The bottom line of preparing your RV for cold weather living is pretty simple. You must ensure that none of your lines freeze. That includes the hose bringing water into the RV as well as the plumbing running water throughout delivering the water.
You have different options to choose from when it comes to the plumbing. But in my travels, I have only seen a single way of preparing the water hose running into the rig. So, let’s start there.
Preparing the Water Hose
The good news here is that the task of preparing the water hose for cold temperatures is pretty simple and inexpensive. You should be able to get everything you need for the job for under $50 or a little more if you need a long heat cable.
You need:
- Water Pipe Heat Cable
- Foam Pipe Insulation
- Duct Tape or Electrical Tape and maybe Painters Tape
- Foam Faucet Covers (2) or Foam Faucet Cover with Plastic Shell (2)
Step-by-Step: Preparing the Water Hose for RV Winter Living
At the time, I thought to photograph the supplies as well as the end result, it didn’t occur to me to take photos as we went through the process of preparing the water line. Not only was I a newbie RVer, I was still figuring out how to capture useful information for this blog. So, my apologies for not more helpful photos to accompany the step-by-step guide.
Step 1
Wrap the water hose with the water pipe heat cable. Instructions should come with the heat cable. But, in brief, there is a button or a little box on the heat cable near the 110-prongs. From the button to the 110-prongs (which is only a foot or two), the cord has no heat (if I remember right) and from the button to the other end is heated. That button goes against the water source pipe coming from the ground with the button near the ground. It leaves a little tail which then gets plugged in. Because it isn’t very long, in all likelihood, you’ll need an extension cord between the plug and the power source. Wrap the heat cable up the pipe from the ground and continue wrapping the cable for the length of your water hose. Go all the way to where it connects into the RV.

Step 2
Cover the hose with foam pipe insulation and tape closed. Okay, so now the hose will be kept warm enough not to freeze. But by insulating everything, it makes the job easier and further protects the heat cable and the water hose. If the foam pipe insulation doesn’t come split, you’ll need a sharp knife or razor to cut it. In this step you want the foam to cover the hose, end to end. Also cover the water source pipe with insulation as well. Tape closed to prevent moisture and cold air from getting in.

If you have trouble finding the foam insulation, a pool noodle (which many RVers have on hand) just might do the job. At least it would protect everything though it may not serve to trap in the heat. I wrote a whole post on uses for pool noodles in RV life and this wasn’t one of the uses I thought of at the time, but it would work.
Step 3
Cover both ends of the water hose (at the water source and where it enters your rig) with a foam faucet cover. The foam faucet cover provides the last bit of insulation at either end of the water hose. In all likelihood, the cover at the water source can simply be set on it. You may need a rock or something to ensure it doesn’t blow off but you have uprightness and gravity on your side. That’s not true where the hose connects to the RV. Therefore, that end will need secured. Secure the foam cover to the hose and you should be okay. If you need more support to hold it on, try painters tape to tape it to the rig. (Painters tape won’t pull off paint the way duct tape will.)
When you are finished, plug in the heat cable. Test everything. Monitor for a few days to make sure you are ready for freezing temperatures.

Additional Notes, Tips and Tricks for Prepping the Water Hose for RV Winter Living
You want to avoid drips. So, before you prepare your water hose for winter, consider replacing the rubber washer to ensure a good seal. As always, you’ll also want to use the water pressure regulator. If you break things (like I did) from not using one, it will be even more disastrous if it happens in freezing temperatures.
Put the seam of the foam pipe insulation face down. It helps prevent snow from sneaking inside the insulation.
These instructions assumed that the water source pipe rose up from the ground. If the water source is at ground level, adjust the instructions as needed. You can see from the final photo that my water source was close to the ground.
If regular winter travel is part of your RV life plan, keep that in mind when you purchase the heat cable. You might kick yourself if you purchase a six foot cable because the size works for where you are parked this year only to discover it’s too short for your location next winter, requiring you to make a new heat cable purchase.
Many RV parks in locations where temperatures regularly dip below freezing in the winter months require their guests to follow certain guidelines regarding winterization. Remember, not only can frozen hoses and pipes cause trouble for you and your RV, water turned to ice can be just as destructive on the pipes coming out of the ground for the RV park. They will inform you and, in my experience, provide instructions and perhaps even assistance if they require you to prepare for winter RV living.

Water Hose: A Non-Conventional Option
On the one hand, this other option seems obvious. But, on the other hand, it could easily be overlooked. So, I wanted to mention it here.
If you don’t want to mess with all this on your water hose, another option is simply to not hook up the hose to begin with. You can put water into your fresh water tank instead. Kind of like what you’d do for water if you were boondocking. Keep in mind, you still have to concern yourself with the pipes running throughout your rig.
This turned out to be a good option for me when I experienced RV winter living conditions in New Mexico. For the most part, night time temperatures were cold but not below freezing. However, for the short and sporadic periods temperatures dipped into the 20s, I simply unhooked the hose. It worked especially well for me since each morning I walked to the bathhouse for my shower, meaning my water needs were minimal.
Quick Update (Two Years After Original Post)
Now, after explaining how to do all that, I recently learned from a fellow RVer about a handy item that will save you nearly ever step I described above. It’s a pricier option than the way I did it but you might find the convenience entirely worth it.
There is now a water hose that comes with its own heating system built into it. In other words: plug it in and you are done. Everyone I know or met at cold-weather campgrounds has the system I described above but if the heated water hose works, it might be the newest and greatest RV thing.

RV Winter Living Prep: End of Part I
If you have lived in your RV in cold or freezing temperatures, I’d love to hear if you prepped your RV water line differently than I described. Next week, I’ll finish the topic of RV winter living preparation.
Part II: Sewer Lines and RV Pipes
To go to the next part of this post on RV winter living, go HERE.
Links to Relevant Posts:
- First 72 Hours of RV Life: Not for the Faint of Heart
- Hack: Adding Carpet to RV Steps
- 6 Uses for Pool Noodles in RV Life
- How to Install a Water Pressure Regulator
To see products recently purchased by readers or to browse and shop at Amazon, follow either of these links. Huge thanks for your support.
- DOZYANT 18 feet Low Pressure Propane Quick-Connect Hose
- DuomiW Mesh Laundry Bag Heavy Duty Drawstring Bag
- Explore Land Waterproof Electric Tongue Jack Cover
- Underhill H75-025R 3/4″ Ultramax Heavy Duty Commercial Hose, 25′
Affiliate Link Disclosure. As a result of being an Amazon Affiliate, I earn from qualifying purchases.


Congratulations on getting the workcamp job you wanted and thanks for this winterizing post.
Thanks, Carol. I’m pretty excited. I have the rest of the winterizing post coming next week.
A question, if using the foam insulation over the heat cable and hose, can the foam withstand the heat cable directly touching it? Will it melt?
Thanks!
Hi Kerry, The heat cable doesn’t get super hot. It’s more warm just to keep the water line from freezing. There may be some cables that get hotter and don’t require the foam. But the foam both keep it insulated and dry. I am not an expert by any stretch of the imagination. I can only share what I did (based on talking to others) and tell you that it worked for me. But if you were worried, check on it frequently in the first days. Best of luck as we go into the winter months.
thank you for the post. I’m moving my 42 foot 5th wheel from Tucson Arizona to central Minnesota to be the handyman on my son’s farm. Big change. I leave in early February. yikes!
Yikes is right! February is a tough time to be heading north. Hopefully the transition will be smooth and the warm weather hits Minnesota not too too long after you arrive. Best of luck, Bart.