
Last week, I wrote about setting up at a new campsite. My original plan included the step-by-step pictorial but it became so lengthy, I decided it was best to break it into two posts. So here is the second one, the guide to unhitching a travel trailer.
While this is specific to travel trailers, perhaps it will have value to those who drive a motorized rig.
Before we start, I have to admit to one thing. I didn’t plan far enough in advance to take photos during an actual unhitching. You know from last week’s post, I really don’t like hitching and unhitching. So some of these pictures are not perfect because, while I debated hitching up my trailer to the van just so I’d have good photos of unhitching it again, in the end I just couldn’t do it.
Unhitching a Travel Trailer

Based on last week’s post, let’s say you’ve checked in at the new location, gotten yourself into the site and gotten the trailer as level as possible without lowing the jacks, whether that meant driving on blocks or not. Following are the remaining steps:
Step 1: Unlock the trailer’s door and put down the steps. I step inside the trailer to look around, to see if anything traumatic happened en route such as drawers coming open, things falling, etc. I also turn off the trailer’s back up camera.
Step 2: Get out the blocks or pads to put under the jacks. This is just the prep work. Don’t lower the jacks yet.
Step 3: Put chocks under tires. It’s important to do this step before you detach the tow vehicle because when it detaches, the trailer can roll a bit. The chocks will prevent this.

Let’s Pause Here
I’m not sure if its an urban myth (because it sure sounds like one) but have you heard the term “hitchhiking?” And not the kind where you stick our your thumb in hopes of a ride.
Hitchhiking is where a nasty person releases the thing from the hitch that holds the ball tight when you are in a restaurant or paying for gas. You don’t notice it. Drive away. Then, when you hit a bump, the hitch bounces up off the ball. The tow vehicle and trailer separate.
Like I said, I don’t know if it’s a thing or not. But I sure as heck don’t want to learn that lesson the hard way. Therefore, I employ a couple of deterrent devices while I’m traveling.
Back to the Steps
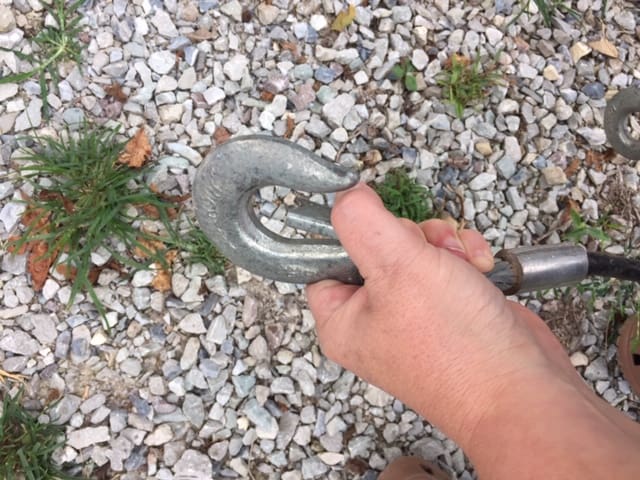
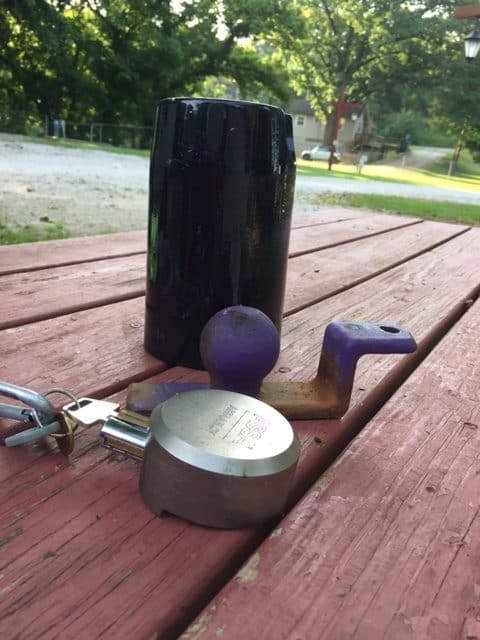
Step 4: Unlock and remove anti-theft device(s) (if you use). My main locked is called “The Collar” which is a trailer hitch lock specifically for bulldog-style couplers. You have to use your own padlock for it. Mine is called a discus padlock.

Step 5: Put down the front jack to lift the tongue, making sure the jack ram comes down in the center of the blocks.
In my case, I raise the jack fairly high as it loosens the chains of the weight distribution hitch (often referred to as an anti-sway hitch). I don’t know if this technique works for every weight distribution and anti-sway device since most of those are bars, not chains.
Step 6: Detach the weight distribution hitch which, even with the tongue up and the chains loose, takes a rubber mallet for me to pound out the pin and get it detached.

Step 7: Bring the tongue back to level, then keep going until the jack isn’t touching the pad. You don’t have to retract it all the way, just make sure the weight is off the jack and back on the tow vehicle. Then pull up the black T handle of the bulldog hitch. You are unhinging the ball-gripper part, making the hitch let go of the tow vehicle’s ball.

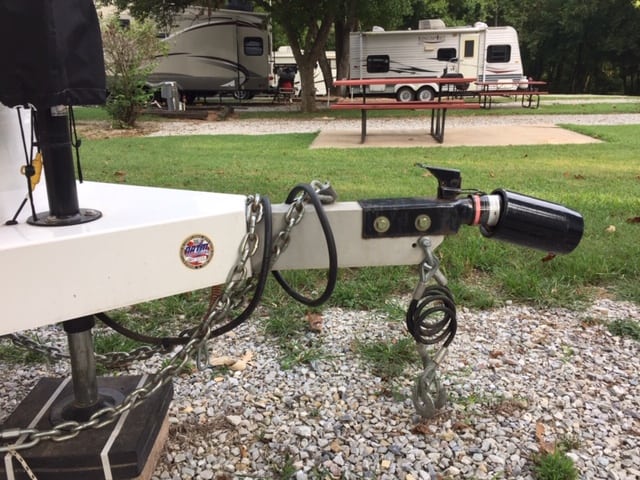
Step 8: Detach the safety cable (or chains), the emergency break-away brake cable and the brake controller cable from the van.

I put a plastic bag over the head of the brake controller. It’s lubricated and, if it rains while you are parked on dirt or sand, the debris bounces up into it. Learned that one the hard way. If it rains, be sure to check the bag, you might have to empty it of water. Be sure if doesn’t reach the bottom of the bag because if water gets in, you don’t want it submerged.

Step 9: Lower the jack again to shift the weight of the trailer back onto the trailer and off the tow vehicle. Continue to lower the jack (raising the trailer) until is clears the ball. Don’t rush. Go slow because if you are at an odd angle or on an incline, separating the two can seem kind of violent. And scary with things rocking and rolling. Going slow won’t stop this but it gives you time to ready your mind for it.
Step 10: Jump in the tow vehicle and move ahead a few inches to clear the trailer’s hitch. While I’m in the tow vehicle, I unplug the trailer’s backup camera monitor (which should have a blank screen if you turned off the backup camera in the trailer) from the 12 volt (cigarette lighter).
Not doing so—yep, yet another one I learned the hard way—can lead to a dead car battery. And, sometimes slow to catch on, I killed my battery three or four times before I finally figured out the cause of the battery drain.

Step 11: Back at the front jack, lower the trailer’s tongue to level. Next, lower the stabilizing jacks. Before they are all the way down, check to make sure they will hit in the center of the blocks you set out to ensure evenly distributed weight.
Step 12: Level the trailer front to back and side to side. In the jacks maintenance post, I talked about my process for getting level and the tools I use.
Step 13: Place the protective cover over the jack stand.

Step 14: Hook up to power, water and sewer. If you have a black tank, wear protective gloves. For information and an important tool when hooking up to water, here’s a post on the water pressure regulator.
One note about hooking up to power. If I arrived at a location with a high temperature, I hook up to power first and turn on the air conditioner so the trailer cools.
Step 15: Wrap the chains and cords around the tongue so they don’t sit on the ground.
Step 16: Place the anti-theft device on to the trailer’s hitch, if you use one. A reason to consider using one is to prevent a nasty person from pulling up a tow vehicle while you are away having fun adventures in your new location and leaving with your trailer.
Even though I’ve talk about trailer security in this post, at some point I may to a more in-depth post on the subject and explain why it’s important that you don’t go cheap on your anti-theft devices. Hint: do a YouTube search and see how easy they are to break into, no matter what a manufacturer says about their products.
Would love some feedback as to whether you’d be interested in a more in-depth trailer security post.
Step 17: Go inside the trailer and test everything. If the microwave is on, I know I’m hooked up to power. Open the water in the kitchen or bathroom to test the water connection.

Success. You have finished unhitching the travel trailer. Do a little happy dance if you want. I always do.
Last Step of Unhitching a Travel Trailer
Then, as I said last week, enjoy the business of settling into a new location. That’s the best part of unhitching…completion.
Next week, we’ll move on to reversing everything we’ve done in the last two posts. Hitching and leaving a location.
Links to Referenced SSL Blog Posts Above:
- RV Checklist for Setting Up at a New Location
- Jacks Maintenance for Your RV
- How to Install a Water Pressure Regulator
To see products recently purchased by readers or to browse and shop at Amazon, follow either of these links. Huge thanks for your support.
Affiliate Link Disclosure. As a result of being an Amazon Affiliate, I earn from qualifying purchases.


Debbie, how long does it take you to do all of this? Does it get faster with practice? Thanks.
Nan, unhitching is definitely faster for me than hitching (you’ll read about that one next week). I would say about an hour or less to do everything from the moment I pull into the site (and I’m not counting the amount of time it can take me to back into the site!) until I”m done, including moving everything from the van to the trailer (pets, bags, notebooks for traveling) and setting up the outside stuff like covering the wheels, putting out the camp mat, chairs, etc. It got easier and faster for me because when I got more confident and I didn’t have to stop to do mental double-checks, triple-checks as much. I could just get the job done.
I just read the “hitchhiking” story to Toby and Kris. Kris told a story about a rancher who spent the night in a hotel and when he came out in the morning, his horse trailer was gone. Too bad he didn’t have a lock like you. Have a great week. Love, Marie
That’s crazy. I know of one RVer who had someone protections on her very small Ta@b trailer. And when she was in a restaurant, the entire thing was a detached from her tow vehicle and stolen. Determined people will always find a way, but in my mind by having anti-theft devices on, I at least increase my chances they’ll pass my rig.