
It wasn’t so long ago that I gave you a list of RV gadgets that might be worth trying inside the RV and outside the RV. (As a side note, a few people emailed to say they purchased the STRONGBACK camping chair and are loving it. As I haven’t purchased one yet, I appreciated that feedback.) When I wrote those posts, I cleared everything from my running list of gadgets to tell you about. I figured it would be a while before the list was long enough to justify another similar post. But then something happened resulting in today’s post which is a hodgepodge of RV tips, tricks, hacks and gadgets.
What Happened?
You would think after downsizing your entire life to fit into the space of an RV that you’d pretty much be done with going through things. Not so. Even with fewer possessions you might be surprised to know, you still end up with bins of stuff. So, when you are in the mood and decide to organize—yet again—you just might find things you didn’t remember you kept. In other words, just like in sticks-and-bricks life, the act of getting your life uber streamlined, uber organized, uber together is one that never ends.

Recently, in a mini-organization bout, I came across a stack of colored index cards. These were cards I purchase almost from the time I made the decision to embark on a full-time RV life. During my research phase, my mindset was one of wanting to learn from others. I wanted to know as many RV tips, tricks, hacks and gadgets as possible.
Each color of index card represented a different aspect of RVing. Orange was for resources. Yellow was for tips and tricks. Green was for gadgets I might want to purchase. Pink was for…well, actually I can’t remember what pink was for.
When I found them, I read through them and—BAM—I had a whole new list of RV tips, tricks, hacks and gadgets. At the time I was researching, I had no idea which RV I’d end up purchasing so many of these are not applicable to the Oliver Trailer. But there are so many modes of RV living, I thought with this wide swath of RV tips, tricks, hacks and gadgets a few might work for most RVers. I hope you find one or two that work for you.
Inside the Rig
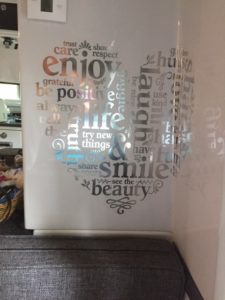
Wall decals are a great way to inexpensively decorate the inside of your RV. You can get decorations, inspirational quotes, pretty much anything you might want. A lesson I learned the hard way: measure your wall space before purchase or run the risk of them not fitting.
Unlike stickers, they are not impossible to remove and don’t damage surfaces. In fact, you can peel them off the wall and reattach somewhere else. I have one that has been in three different locations. In addition to stores and Amazon, also check out etsy. I met other RVers who found great decals there. In fact, one RVer contacted an etsy creator and asked for custom-made and fitted decals to perfectly match her décor.
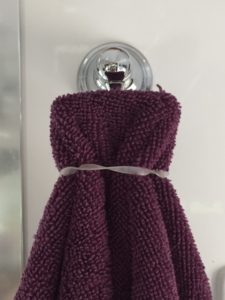
Remember in the post about things I hate about my Oliver? One of the things was the fact that all the hooks, though pretty, are not “hooky” enough to be of any use. A fellow Oliver owner emailed me with a creative solution.
Put a rubber band around the hook at the wall, place your towel on the hook and bring the rubber band down the towel a bit. Brilliant. Thanks, Denise. No more falling off the hook.
Weather
Rain: If you have the awning out and it starts to rain, angle one side down a little to make sure water runs off. If you don’t do that, you risk water collecting on the awning and getting so heavy that it breaks the awning. And, if you are worried you might forget to do this when it starts raining, many RVers always leave their awning slightly angled.
Dust: In a very dusty warm environment, you can get an air conditioner / furnace filter. Put it over the inside of an open window to filter out dust but still let air in. A thick fine mesh filter works best. You’ll see an MPR number on most filters. It stands for microparticle performance rating and the higher the number the more microparticles your filter will capture. Be sure the overall size of filter closest fits your window opening. This is a good option when boondocking.
Heat: In a very hot environment, cut Reflectix to fit the window and it will prevent heat from getting in. Likewise, if it’s cold outside, the it can prevent heat loss from the RV. Bonus tip: use blue painters’ tape to secure the insulation without risking damage to your RV.
Bugs and Pests
If you have flies, spray them with Windex. The ammonia knocks them out and they fall. Much easier than chasing them around with a fly swatter. Instant bonus: you clean at the same time.
When I was a kid, on a car ride if a bug slatted on the window, my Dad would say, “Bet he won’t have the guts to do that again.” Haha. I still think of that whenever I hear or see a bug hit my windshield head on.
But, seriously, how do you get sunbaked splatted bugs off the front of an RV or tow vehicle? First, make sure it’s really well waxed. In fact, over wax the places where bugs splat. Then after a road trip, wet a Bounce fabric sheet and they should just wipe right off.
If your dog brings fleas into your RV, you probably have a regime for getting rid of them (medicated baths, I’m guessing, followed by a new flea collar) but when you vacuum them up from around the rig, they remain alive in the vacuum. To kill them, snip the end of a flea collar and place it in the vacuum bag or bagless container to kill the fleas and keep them from getting out and back into your rig.
Cooking
In an RV oven, place a pizza stone in the bottom of the oven for better and more even distribution of heat. Be sure to remove on travel days or it may break.
If you travel with a grill, cover the inside of the top with foil for splatters. Then replace the foil as needed instead of scrubbing the lid. This is a good tip for non-RVers as well.
Leveling
A swinging door inside the rig can help determine if the rig is level. If it is, an open door shouldn’t swing.
Travel
In past posts, I’ve shared how I use suction cups connected by a bungee cord as extra security for kitchen drawers to stay shut during travel. My bathroom door is a mirror and it didn’t occur to me to secure it until I found it broken after travel.
Now, in that case, it was the frame that broke rather than the mirror and the reason it happened was the frame wasn’t installed properly. So, the good news was Oliver covered the cost of the fix. And more good news was that it taught me that it might not be a terrible idea to secure the door rather than simply relying on the thumb lock.
While two suction cups and a bungee would work fine, I already have hooks on either side of the door so I use those. And since I still have a dog leash hanging from one of the hooks, why use a bungee? I attach the leash to the other hook and I have double security that my bathroom door won’t open during travel.
Freshening Up Your Tanks
This tip comes with a disclaimer. It’s important to read your instruction manual as the manufacturer of your RV or tanks might have a preferred method to clean and sanitize your tanks.
Gray Tank: With bits of food, soap scum and the constant standing water, conditions are ideal for things to grow in your gray tank. This applies not only to the tank itself but also to tubing coming or going from the tank.
Fresh Water Tank: You might think it isn’t necessary to freshen a fresh water tank since only clean water passes through but it can still be a good idea to do it once in a while. This is true even if you don’t drink water from the tank.
The process is the same for both tanks. Fill them nearly to capacity with water. Obviously with the gray tank, make sure to close the sewer hose so it isn’t draining. Add bleach to the tanks and let set 6 hours. Drain.
A few notes:
- Manufacturer’s instructions can tell you how much bleach. However, a Google search said a good formula is ¼ cup bleach to every 15 gallons of water. So, if your tank has a 60-gallon capacity, use 1 cup of bleach. How much bleach you use will depend on the size of your tanks.
- To get bleach into the gray tank, mix the bleach with some water and slowly pour down drains. Be sure to divide it up and pour down every drain in the RV so the bleach gets to the tubing.
- To get bleach into the fresh tank, unhook the water hose at the water source and empty it. Fill the hose with bleach, then reattach it to the source and turn on the water to force the bleach into the tank.
- After you drain the fresh tank, it’s a good idea to refill it with fresh water and drain again to make sure you don’t have bleach in your drinking water or end up an accidental bleach blond.
Since I never intended to have a black tank, I have no notes about cleaning those but an internet search or your manufacturer’s instructional manual should be able to help.
Other RV Tips, Tricks, Hacks and Gadgets?
After today, I start again with a blank page and when I accumulate enough nuggets of wisdom, awesome gadgets and must-try hacks, I’ll do another post on the subject. In the meantime, please add to the list or share your thoughts with the ones I’ve mentioned here.
Links to Posts Referenced Above:
- Gadgets Worth Trying Inside the Rig
- Gadgets Worth Trying Outside the Rig
- Oliver Travel Trailer Review: 5 More Things I Hate
- Fast, Easy, Low-Cost RV Hacks
To see products recently purchased by readers or to browse and shop at Amazon, follow either of these links. Huge thanks for your support.
- Rexing Ultra HD Car Dash Cam 2.4″ LCD Screen
- Salt and Pepper Shakers Moisture Proof
- Better Living Products TRIO 3-Chamber Soap and Shower Dispenser
Affiliate Link Disclosure. As a result of being an Amazon Affiliate, I earn from qualifying purchases.


On the road or off … the gadgets never end.
Have a great week.
Love, Marie
So true. And somehow I’m always surprised. Each time I write one f these posts, I think that will be it for a long while. Within a few months,
y list is long again.Hey Debbie, love your blog. Please tell me how much bleach do you add to the fresh water tank? Thanks, Nan Wallace
Debbie, please scratch that question. I should have finished reading your blog!! LOL Nan Wallace
You’re so funny! I hope you are doing well, Nan.
Hi Debbie, another tip to keep water from pooling on your awning in the rain is to put pool noodles on the arms. This lifts up the fabric from sagging. They can also be used on the bracing arms if you forget to duck when walking under them.
Ken, that is a good idea! It’s now added to the list for the next post. I knew to use the noodles to keep from banging into them but it never occurred to me they could be useful up top. Thanks, Ken. You know, I’ve written several posts like this and I think at least three or four of the ideas came from you. I appreciate you sharing your knowledge and tricks with me!
Love reading your posts, even though we don’t have a trailer…yet. Great advice, interesting travelogues, beautiful pictures! Thank you for all you do!
So kind of you to say, Ruth. You are very welcome. I enjoy writing them.